
Wondering how to turn a founder story into a content series? Start by pulling out the decisions, lessons, and proof behind your business, then publish them in an order that moves readers from recognition to a relevant next step. A practical sequence is: problem, failed attempt, insight, method, proof, objections, and invitation.
This approach turns a founder story into a content series that does more than fill an About page. It can explain the problem you saw, the choices that shaped your approach, and the value customers can expect. Each post should give the reader one useful idea and one sensible next step. The result is a trust-building series that supports your wider content plan without becoming a stream of personal updates.
How to turn your founder story into a content series that serves the customer
A founder story is not a full biography. It is a selected set of true moments that explains your point of view.
The useful question is not, “What happened to me?” It is, “What did I learn that helps this audience make a better decision?”
For Content Redefined AI, that might mean describing the moment you saw founders struggle to maintain a clear publishing rhythm, then showing how a structured planning process can reduce that uncertainty. The customer remains the main character: the story explains why your method exists and what it helps them do.
Write a positioning spine first
Before drafting posts, write four short statements:
- Audience: Who are you trying to help?
- Problem: What is difficult, expensive, or unclear for them?
- Point of view: What do you believe is a better way to handle it?
- Credibility: What experience, decisions, or evidence led you there?
For example:
> We help busy business founders create a clearer publishing plan. We believe consistency starts with direction, not more ideas. That belief came from seeing how often good content stalls without a simple system.
This is not final website copy. It is a guardrail that keeps each story connected to your positioning rather than drifting into autobiography. If the audience is still broad, start with understanding your audience for content marketing before choosing your angles.
Build a story-asset inventory
Set aside an hour and list raw material before you write. Look for moments that contain a decision, a tension, or a lesson.
| Story asset | Questions to ask | Possible post angle |
|---|---|---|
| Origin moment | What problem did you notice first? | “The problem I could not ignore” |
| Constraint | What made the work harder? | “What a small team taught us about focus” |
| Failed attempt | What did you try that did not work? | “The approach we stopped using” |
| Turning point | What changed your mind? | “The insight that changed our process” |
| Method | What do you do differently now? | “Our planning process, step by step” |
| Proof | What can you show honestly? | “What changed when we simplified the workflow” |
| Objection | What concern comes up most often? | “Who this approach is and is not for” |
Use only claims you can support. Proof can be a process walkthrough, a product demonstration, an anonymized example, or a clear description of what changed. It does not need inflated numbers.
Be open without oversharing
Authenticity is not the same as disclosure. Share the lesson, not private details.
Avoid client names, personal messages, confidential financial details, and stories that involve other people without their permission. If a detail does not help the reader understand the decision or apply the lesson, leave it out.
Use this seven-post founder story sequence
There is no single best sequence for every company. But this order works well because it moves from recognition to understanding, then to action. It also prevents the common mistake of repeating the same origin story in every post.
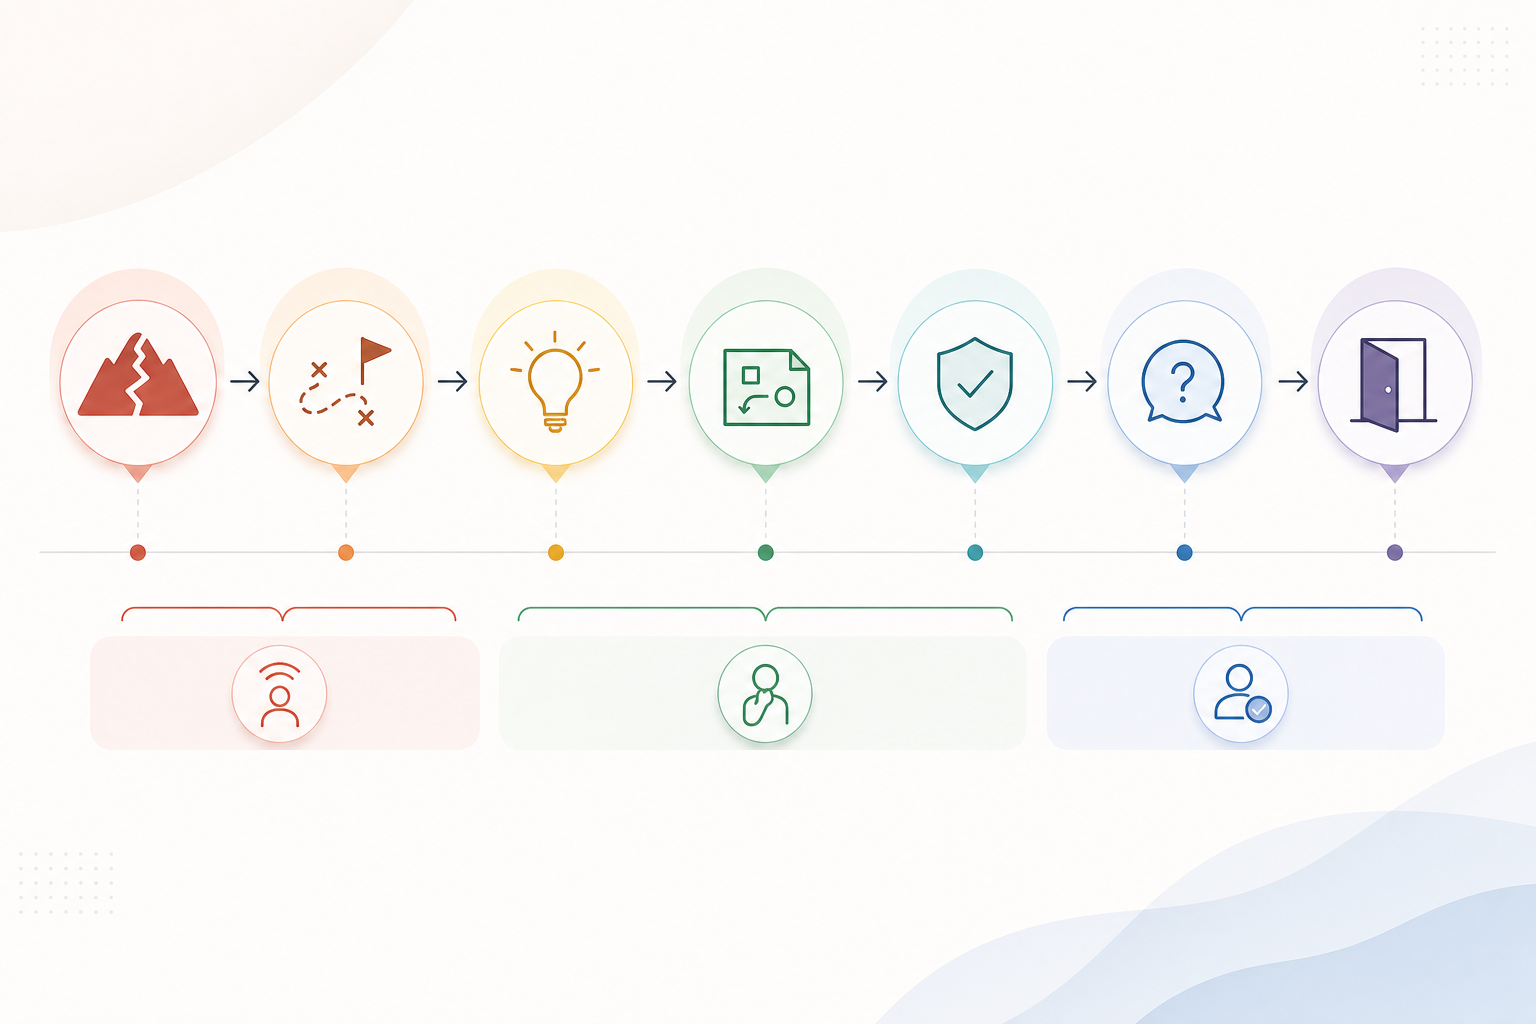
Post 1: The problem you noticed
Goal: Help the right reader recognize their own situation.
Describe one specific scene or pattern. Name the cost of leaving it unresolved. Keep the product in the background.
Example angle: “Why talented founders still struggle to publish consistently.”
CTA: Invite readers to follow the series or reply with the part of the problem they find hardest.
Post 2: What you tried first
Goal: Build credibility through an honest lesson.
Explain what you expected, what happened, and what you learned. Do not blame a person or a tool. Focus on the assumption that proved incomplete.
Example angle: “Why more content ideas did not solve the planning problem.”
CTA: Link to a related guide or ask readers which approach they have already tried.
Post 3: The insight that changed your approach
Goal: Introduce your point of view.
Use a simple structure: old belief, new belief, and what changed in practice. This is the bridge between story and strategy.
Example angle: “Consistency is a planning problem before it is a writing problem.”
CTA: Offer a practical question readers can use to assess their own process.
Post 4: The method
Goal: Show how your approach works.
Turn the insight into a clear process with steps, inputs, and outputs. Readers should understand the work involved, even if they decide to get help with it.
For example:
- Define the audience and business goal.
- Choose a small set of recurring themes.
- Match each theme to a customer question.
- Plan a realistic publishing cadence.
- Review what prompts qualified replies, signups, or sales conversations.
This is also a natural place to link to a deeper resource, such as how to develop a content strategy.
CTA: Invite the reader to apply the method to one upcoming week of content.
Post 5: The proof or working example
Goal: Make the method easier to evaluate.
Show a real process, a before-and-after workflow, or a carefully anonymized example. Include what remained difficult. Honest limits make proof more useful.
Example angle: “From a blank calendar to four connected post ideas.”
CTA: Point readers to the next installment or to the part of your offer that helps with implementation.
Post 6: The objections and trade-offs
Goal: Reduce friction before the invitation.
Address questions such as:
- “I do not have time to publish every week.”
- “I am not comfortable making the brand about me.”
- “Will this work if I do not have case studies yet?”
- “Can I use AI without losing my voice?”
Answer directly. State who your approach is for, who may not need it, and what it will not solve. A clear boundary is more credible than a universal promise.
CTA: Suggest the next practical step for readers who are a fit.
Post 7: The invitation
Goal: Turn informed interest into a clear action.
Summarize who the system is for, the problem it helps address, and what ongoing support looks like. For a monthly subscription, position the offer as support for a sustained publishing practice, not a one-time miracle.
Example CTA: “If you want a clearer plan and a consistent way to turn your expertise into content, explore whether a monthly Content Redefined AI subscription fits your workflow.”
Connect each post to conversion without making it an ad
A story post earns attention through relevance. A call to action should help the reader continue from where they are, rather than push them into a decision they are not ready to make.

Use one main CTA per post and match it to the reader’s level of intent.
| Reader stage | What the post should do | Suitable next step |
|---|---|---|
| Early awareness | Name the problem and create recognition | Follow the series or respond to a question |
| Active consideration | Teach a method or reveal a trade-off | Use a planning prompt or read a related guide |
| Decision | Show fit, limits, and implementation | Explore a monthly subscription |
Use a value-first CTA ladder
The ladder below gives your series a progression without treating every reader as sales-ready.
- Conversation: Ask a focused question at the end of an early story post.
- Learning: Link to a useful guide that expands on the lesson.
- Planning: Invite the reader to apply the framework to their own situation.
- Subscription: Present the monthly offer when the reader has seen the method, proof, and fit.
For example, a post about a failed publishing process might end with a question about the reader’s bottleneck. A post that teaches your planning method can then direct them to create a content calendar. The invitation comes later, once the reader understands why structure matters.
Stories tend to resonate more when they reflect an outcome the reader hopes to achieve, rather than simply celebrating the business behind them (Grow and Convert on content strategy).
Keep sales language specific
Avoid vague prompts such as “Transform your content today.” Say what the reader can expect instead.
- Less useful: “Get more from your story.”
- More useful: “See whether a structured monthly content plan can help you publish with more direction.”
- Less useful: “Join now before you miss out.”
- More useful: “Explore a monthly subscription if you want ongoing support to plan and maintain your publishing schedule.”
Specific language protects trust and makes it easier for the right prospect to self-select.
Publish the series across your blog, email, and social channels
Your blog should be the home for the complete version of each lesson. It gives you room to explain the context, teach the process, and link readers to the next post.
Social and email can introduce a single moment or insight from that longer piece. They do not need to repeat it word for word.
Use one core idea, then adapt the format
For each post in the series, create a small distribution set:
- Blog: The full story, lesson, and next step.
- LinkedIn: A short scene, a strong point of view, and a question that invites a real response.
- Email: A direct note that connects the lesson to a subscriber’s current challenge.
- Short-form video: A brief hook, the key moment, the lesson, and one question.
- Relevant communities: A problem-first discussion that adds value before mentioning your business.
Do not publish promotional links where a community’s rules prohibit them. On forums and in Slack groups, answer the question at hand. If readers ask for more detail, point them to the relevant resource.
Use replies as research
Comments, emails, and sales conversations can reveal the phrases people use for their problems. Save recurring objections and questions in your content notes. They can become future posts, better headlines, or clearer product language.
For search-focused posts, pair that qualitative research with keyword research for content creation. The goal is not to force keywords into a personal story. It is to make useful lessons easier for the right people to find.
Make the series easy to find and follow
When you turn a founder story into a content series, the goal is to create a connected content system rather than seven isolated posts.
Create a simple hub page
Build one hub page that explains the series promise and lists every post in order. Include:
- A two- or three-sentence introduction
- A short description of who the series is for
- Links to each post with a one-line summary
- A clear next step for readers who want ongoing help
In each individual post, link back to the hub and point to the next relevant installment. This helps readers continue the journey and gives the series a coherent structure.
Use consistent language
Choose names for your core ideas and stick with them. If you call the first post an “origin moment,” do not later call it a “founding epiphany” or “start-up spark.” Consistent terms make the method easier to remember.
Set a cadence you can maintain
Weekly is a reasonable starting point if you can sustain it. Every two weeks is better than a rushed weekly schedule that stops after a month.
Batch the work where possible: extract story assets in one session, outline two posts at a time, and schedule distribution after the core article is ready. If planning and scheduling are the constraint, automating a blog content calendar with AI can help you think through a more repeatable workflow.
Measure whether the series is building the right kind of trust
Traffic is useful, but it is not the only sign that the series is working. A smaller audience that takes meaningful action can be more valuable than a large audience that only skims.
Review three groups of signals:
- Attention: Engaged time, scroll depth, returning visitors, and movement to the next post.
- Conversation: Thoughtful comments, email replies, direct messages, and questions from qualified prospects.
- Conversion quality: Email signups, subscription-page visits, trial starts if you offer them, and sales conversations that mention the series.
Give the series time to develop. After several posts, look for a weak link. If readers leave after the origin story, make the next-step link clearer. If they read the method but do not act, test a more concrete CTA or simplify the action you ask them to take.
FAQ
How long should a founder story content series be?
Seven posts is a useful starting point because it covers the origin, failed attempts, insight, method, proof, objections, and invitation. If you have less material, begin with four posts: problem, turning point, method, and invitation. Add proof and objections when you can support them.
Should founder stories live on the blog, social media, or both?
Use both, with different jobs. Publish the complete, searchable version on your blog. Use social posts and email to share individual insights and bring readers into the full series. A hub page helps connect the pieces.
How do I avoid making the series too personal?
Tie every story to a customer-relevant lesson. Keep private details private, remove anything that does not serve the point, and be precise about what happened. You can be candid without turning the reader into an audience for your diary.
What are the seven steps of content creation for this series?
- Define the audience and goal.
- Extract story assets.
- Choose one lesson per post.
- Outline the seven-post sequence.
- Draft the complete blog version.
- Add a stage-appropriate CTA and internal links.
- Publish, distribute, and review the quality of responses.
The aim is not to tell your story once. It is to build a clear body of content that explains your perspective, helps prospective customers, and gives them a credible reason to keep reading—or to choose ongoing support when they are ready.